Category Archives: Electric Quilt

Crib quilt

Here’s the quilt for the newest member of the family and part two of my previous post titled Legacy and Heirlooms.
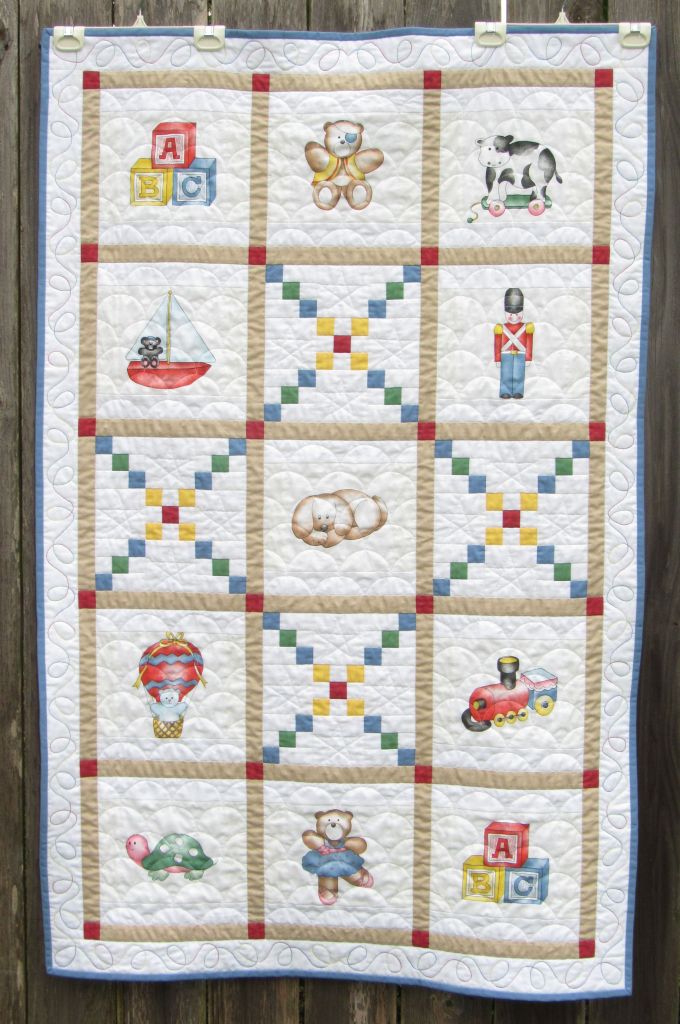
It felt incomplete to hand down bumper pads and a crib skirt with no quilt, so I dug out the leftover nursery fabrics and scanned everything into Electric Quilt in preparation for creating a layout.

There was enough of the main print in the collection to feature prominently in the layout, although I was bothered about having to build out each fabric image to get to a 9-inch block size.

I was worried about having enough leftover background fabric from my mom to cut the strips for these blocks. Thankfully, there was, but just barely.

Also disappointing was that the border dots around each image were not available on all the scraps so it wouldn’t show in the final blocks.

There wasn’t enough of the two coordinating prints to make a cohesive-looking layout, so

I revised it to incorporate solids into the chain blocks. But what about sashing color?

John suggested gray. Then it dawned on me that instead of gray, a taupe color would be perfect, picking up the taupe used in the bears and the dog.

Three of the five colors were in my stash,

but I had no taupe and could not find a suitable red – a trip to the quilt store was in my future. I wasn’t excited about having to buy more fabric, but I wouldn’t need much and besides, you can justify almost anything when it’s for a new baby.

I was lucky to find a one-yard cut of matching white in my stash for the chain blocks and border which, despite its diminutive size, had to be pieced in five places. It was close and cutting mistakes were not an option.

Chain block construction took a lot of time because of the one-inch finished square size and the fact that they were not strip pieced.

To conserve fabric, I eliminated seams in the corner units.

The backing fabric is the same multi-colored pin stripe I used for The Bias Tape quilt.

This project was heavily quilted to help it survive countless washings, tugging, pulling, bunching and dragging: in the ditch with the walking foot, followed by free motion quilting elsewhere. The clam shell motif was added to the image blocks; it was fun and easy to quilt and provided sufficient coverage.

Five-pointed stars were quilted inside the chain blocks.

I struggled with the border quilting, walking away from the project for about 10 days out of frustration. I had the perfect thread (the wrapper even says so), a 17-weight, 100 percent cotton variegated in primary colors from Superior Threads. Oh, the tension issues!

I wanted to use cream colored thread in the bobbin and tried 50-, 40-, and 28-weight, each to no avail. In the end, my sense was that the difference between the weight of the two threads was too large to ever resolve any tension issues. I begrudgingly loaded a bobbin with the variegated thread and finished the quilting. I wasn’t thrilled with the way it looked on the back, but baby needed variegated thread! so I had to make it work.

I’m pleased to add my contribution to the crib set that my mother made 30 years ago. I truly hope that the quilt becomes a favorite and will be used and loved. If not, maybe it will become a favorite for a little someone in the next generation.

Next: Crib sheets

2 Comments

Filed under designing, Electric Quilt, machine quilting, piecing, thread

Tulips

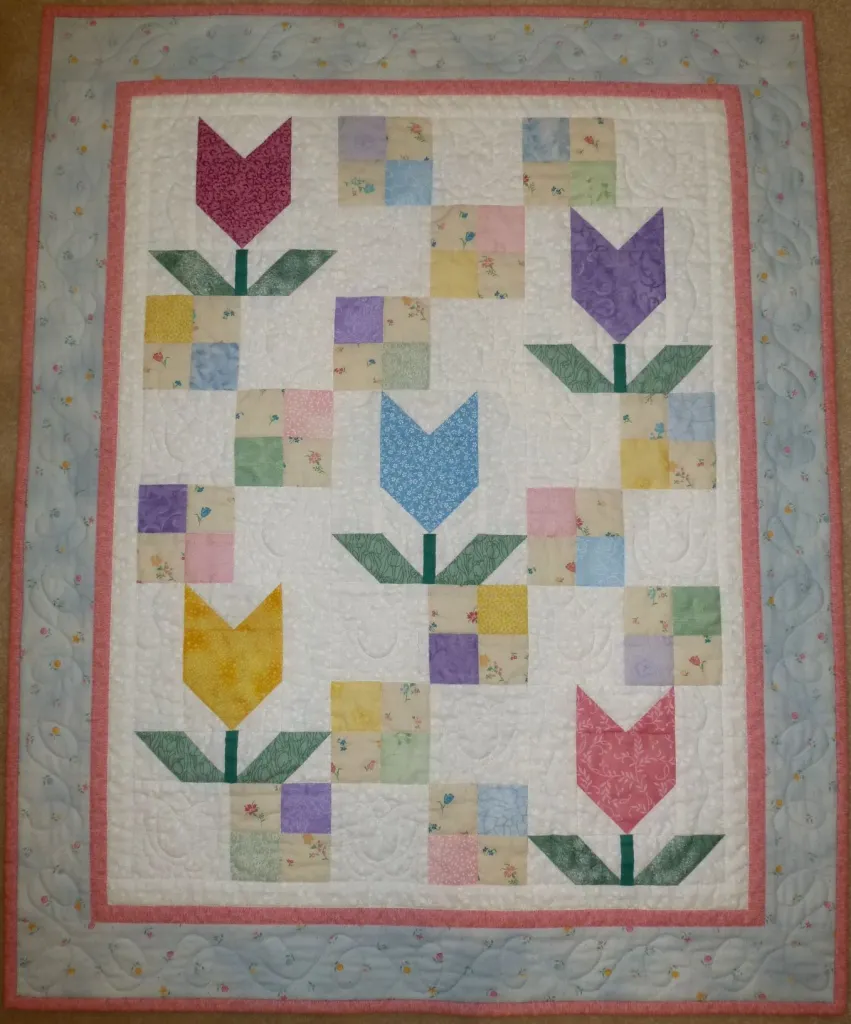
Sometimes, good things are a long time coming, like this adorable, tulip-filled wall hanging.

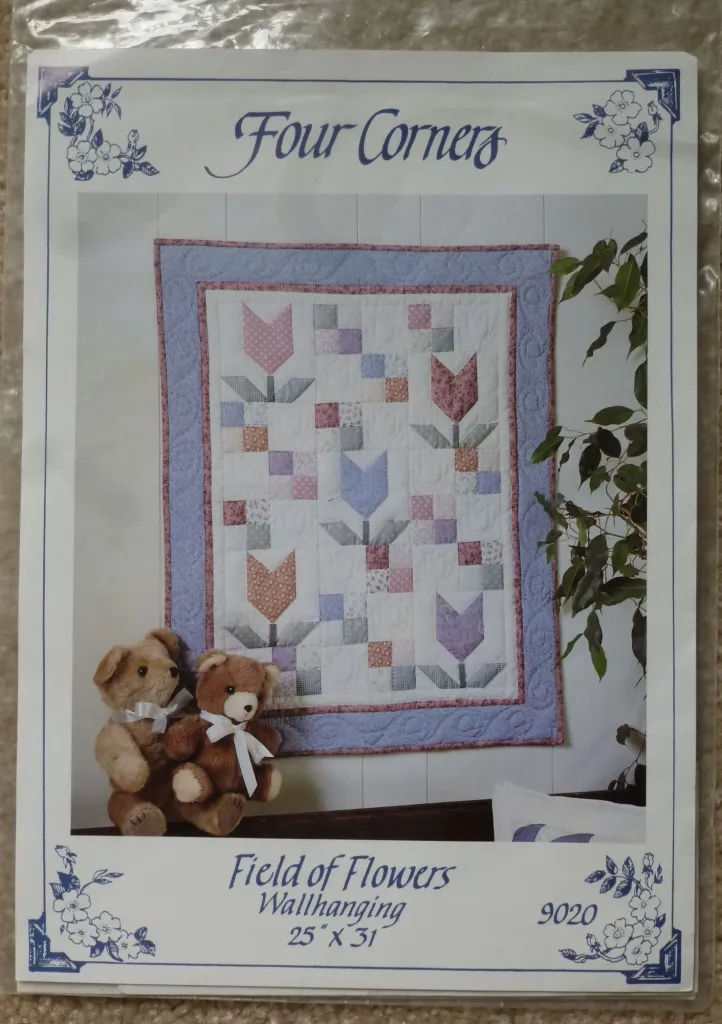
The pattern, Field of Flowers, was purchased long ago when I visited my hometown for my 20-year class reunion.

After returning home from the reunion, the pattern was tucked away in my crafting space, as I was busy with a toddler and pregnant with our second son, who was causing me to feel like I had Epstein Barr – zero energy and a chronic, overwhelming need to sleep.

Several years later, during a rare weekday moment with no kids, I took the pattern to a quilt store and purchased a bunch of fabrics for it, mostly quarter-yard cuts.

This Kona Bay blue was the starting point. I loved it so much I bought a whole yard just so I would always have extra.

This white-on-white tulip print was perfect.

This Hoffman print has a wonderful hand to it.

I dutifully washed and ironed the fabrics, draped them neatly on a hanger and tucked them into the back of the guest room closet. There they stayed until the fall of 2020 when I turned to this project in hopes of bringing myself out of a Covid-induced sewing slump, and to my surprise, I kept after it and finished it in February this year.

To start, I pulled all the fabrics that had been in hiding for two decades, scanned and imported them into Electric Quilt so they could be plugged into the layout for a general review.

The three greens chosen for the leaves and stems looked good, but there were issues with a couple of the prints chosen for the tulips.

The yellow and purple prints were too light, causing those tulips to appear washed out, and the pink used for the lower right tulip was too dark. No problem – fabric stash to the rescue.

Much better!

As I auditioned the fabrics, I thought it would be fun to show a final comparison of those purchased 20 years ago versus those that ended up in the final quilt and grade myself on how well I chose the original fabrics. I took photos of everything (below) and made notes, in the end learning that I did okay, using 2/3 of what was purchased. Hey, it was more than half, right? More important is that I still like all the original fabrics; they’re not duds because they weren’t used in this quilt; they just became available for a future quilt.

In hindsight, this little wall hanging was deceptively more work than its looks reveal: In addition to all the triangles required for the tulip and leaf units, creating the stems and piecing them into the block was quite the challenge.

The instructions called for a 1¼” wide piece of fabric, sewn wrong sides together with a ¼” seam.

The seam allowance is then trimmed to ⅛” and pressed so that it is not visible from the front side. The instructions were unclear whether to press the seam allowance open or to one side, so I decided to press it open to evenly distribute the bulk across what would be a ⅜” finished width. The challenge was how to do it smoothly. I asked John if he had anything in his shop that might help, and he found this:

It worked perfectly – just like a sleeve ham used for making garments.

The metal shaft was narrow enough in diameter to fit inside the fabric tube but wide enough to support the seam allowance as the iron was run along its length to open it.

What resulted was a superbly crisp, smooth and flat little fabric stem.

The other challenge with the stems was getting them centered over the seam joining the two leaf units while aligning the stem’s center with the point at the bottom of the tulip.

After multiple tries, it was clear that even the most careful pinning was not working so I basted them in place

and got closer to the result I wanted.

One perplexing thing was that the pattern did not address the five loose loops of stem fabric that resulted from the way they were sewn into the top. I took the extra step to hand tack the stems along each side using matching embroidery floss.

This wall hanging was mostly ditch quilted

with the addition of a simple tulip motif, provided in the pattern, in the white squares next to the 4-patch blocks.

The border motif was from a stencil I had on hand: a simple but fun reversing loop.

I love the way it turned out and am glad I finally brought this project out of the past.

Leave a comment

Filed under Electric Quilt, fabric, machine quilting, piecing

Tidbits

I finished piecing two more plaid star blocks and I’m really liking the way they’re turning out, even though the going is slow.

I also finished the second charity quilt required by my guild. Both quilts allowed me to practice quilting on my APQS George, and although I’m still getting used to it, I learned a lot. Now I’m anxious to finish a couple of my own quilts that have been languishing in the UFO pile because they are too big to run under the Bernina with any modicum of success. Twenty inches of throat space is magical!

Admittedly, the quilt is nothing special to look at, as the fabric in the kit put together by the guild is vintage 1990s, but hopefully it will get good use and keep someone warm.

Over the weekend, I upgraded to Electric Quilt 8. It was nice to save a little cash by having the option to download the two guides rather than having to purchase a printed manual.

I got both printed and bound, and worked through the first exercise in the Quick Start Guide.

The user interface is completely different and I really like it. Now I’m wishing for a week off from work to immerse myself in it and start designing again—maybe over the holidays.

My last little tidbit of news is that I scored a free ticket to the Houston Quilt Festival next weekend.

The woman who cuts my hair has a client who works for Quilts, Inc. The client left some complimentary tickets with her to give to her customers so she called and asked if I wanted one! I only have one day to go, so it will be a marathon day, but I’m looking forward to it.

Happy quilting!


Leave a comment

Filed under Electric Quilt, machine quilting, piecing

A little learnin’

I finished quilting maple leaves in all 24 rail fence blocks of my wall hanging—yay!

And more good news…after a whole lot of dinking around in Electric Quilt, I finally figured out how to quilt the tree blocks for this project.

Cool, yes? Actually, it’s a huge relief because I didn’t think I would ever finish this little project for lack of a quilting plan and a years’ long mental block in coming up with one. What in the world was so hard about it? I still don’t know.

At one point, I quilted continuous curves in the background triangles and rectangles of four of the blocks, but ended up ripping it all out.

While I was satisfied with the technical quality of the stitches, I just didn’t like the way it looked. Seriously, this quilt was going to have to be re-named from something romantic like Trails Among the Pines to Arrested Development if I couldn’t get it together.

Now, with this major hurdle cleared, crossing the finish line is a reality. Getting there sure wasn’t easy, but I learned some things about editing quilt motifs in EQ, so it was worth it.

I started by importing this stencil design from the block library into the sketchbook for my project.

Once in the sketchbook, you can highlight the stencil design and click on the edit button to put it on the worktable.

Once it’s on the worktable, you can find out to what extent the motif is editable.

Click on the Pick tool and click around inside the design to understand how the motif has been sectioned; some stencils in the library contain one section, limiting your ability to edit them.

The motif I chose had four sections and I eliminated three of them by clicking on each section with the Pick tool to highlight it and then pressing the Delete key.

With one section of the motif left on the worktable, now I could start editing it.

First, I moved the motif to the center of the block.

Then I rotated it 45 degrees to orient it to an upright position.

Electric Quilt also lets you flip vertically and horizontally, but in this instance, neither was necessary.

Once the motif looks the way you want it to, save it to the sketchbook, then you can return to your quilt layout and place the edited motif inside.

One thing that helped, once I caught on, was to reduce the block size for the motif before saving it to the sketchbook so it would be easier to size once inside the layout.

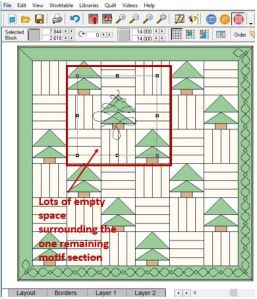
The original block size of the stencil motif was 14 inches—notice how much empty space there is around the one section that was retained and centered.

My blocks are only six inches square, so I reduced the stencil motif block to three inches square. This made it much easier to drag it around within the layout, work around other motifs under consideration and size it within the block.

Now I’d better get back to it. Thanks for stopping by!

Leave a comment

Filed under Electric Quilt, machine quilting

When snowflakes fly sideways…

Sunday snow

…all day Sunday, you make a prototype of the triangle border for your spring quilt.

border

Electric Quilt offered two cutting options for the isosceles triangles in the border of my spring quilt: rotary cutting or a template.

Here is the rotary cutting diagram it generated:

rotary cutting diagram

Hmmm, cutting to a sixteenth of an inch in both directions and ensuring two 39-degree angles…I’m thinkin’—no.

So I printed the template pieces, one for the five large triangles in each border and one corner and its reverse for the other end,

template pieces

and taped them together with the aid of a light box:

light box

Here are the three templates spliced together and trimmed to include the ¼” seam allowance:

templates

Next, I applied pieces of double stick tape to the backside perimeter of each template. This should hold the template in place on the fabric while cutting around the three sides.

double stick tape 

Here is the prototype:

prototype1

The length was great, but somewhere I messed up and ended up with these:

bad seam2

bad seam1 

Today I made a second prototype and it turned out well:

prototype2

I’m now ready to cut into the good fabric and make the border for real.

border fabric

Next post, I’ll show you how I cut out the triangle pieces to conserve fabric and still keep the base of the triangles on the lengthwise grain.

Oh, and here are this week’s Aunt Grace blocks:

AGG50

Leave a comment

Filed under borders, Electric Quilt, piecing

Dealing with distractions

Not much going on around here, accompanied by not much quilting. I’m still highly distracted, keeping up with a high school senior’s end-of-year schedule, spring cleaning in anticipation of an overnight houseguest, and initiating some maintenance on our house, which involves phone calls, emails, estimate gathering and scheduling. I’m not thrilled about the intrusion into our personal space, but it must be done.

I have been working sporadically on my spring quilt, and will take a picture of it when the top is completely pieced.

In the meantime, I am staying true to my promise to keep up with my Aunt Grace blocks:

AGG40

This week, I finished the second chapter in Electric Quilt’s pieced drawing book featuring the EasyDraw drawing option. EasyDraw is like using graph paper and a pencil—minus the 50 pounds of eraser shavings I would be buried in if I was using real graph paper and a real pencil. Chapter 2 wasn’t as difficult as chapter 1 because I’ve used EasyDraw so much already, but I did learn to use the grid and edit line tools, which I hadn’t bothered with before now.

Required exercises included the drawing of 15 variations of a basket block, these being some of my favorites:

Ch2 basket blocks

To cement the four rules necessary for creating usable paper pieced blocks, the author has you draw house blocks, which bored me, mostly because making a quilt with house blocks sounds rather boring.

Ch2 house block

Then there were some Drunkard’s Path block variations, shown here in quilt layouts because the block is way more interesting when viewed this way:

Ch2 DPath1

Ch2 DPath2

There was a short lesson on drawing a double Irish Chain block,

Ch2 Irish Chain

and Tree of Life blocks

Ch2 TOL blocks

Thanks for stopping by!

2 Comments

Filed under Electric Quilt, piecing

Distraction and triangle confusion

I’ve been very distracted lately, so progress on my spring quilt is somewhat stalled. When I finally mustered a small bit of attention span to work on it last week, I realized a serious cutting mistake which needed correcting. Fortunately, I wasn’t too far into it, so things were salvageable.

The original layout was a straight horizontal set

quilt9

featuring this block called economy:

economy block

To reduce the number of seams, I converted the layout to an on-point set

quilt11

consisting of square-in-a-square blocks alternating with 4-patch blocks.

sq-in-sq block

4-patch block

When I printed the rotary cutting instructions for the pieced setting triangles featured in the on-point layout, this was what Electric Quilt generated:

cutting1

The diagram shows the white triangles as half-square triangles, and despite my funny feeling about that, I proceeded to cut two or three squares in half and position them on the design wall. In a flash, my funny feeling became full-blown realization: half-square triangles are used to finish the corners of diagonally set quilts; I needed quarter-square triangles for the setting triangles. (Can you tell I’ve made very few on-point quilts?)

Sewing half-square triangles into the pieced setting triangles would result in a bias edge the entire perimeter of the quilt top (before borders). This top would stretch out of shape so fast, it wouldn’t be worth the bother.

So why did the EQ instructions call for half-square triangles?

EQ allows you to position a block in every other space of your layout by pressing the ALT key. This means the software reads all those partial blocks (like the one highlighted in green, below) as 4-patch blocks.

quilt setting triangle

The triangles that are visible in the layout are therefore assumed to be half-square triangles.

To confirm this, I checked the cutting instructions for the horizontal set layout made with the economy block.

quilt block selected

Sure enough, there was the diagram for quarter-square triangles.

cutting2

This reminds me of a conversation with our boys many years ago when they were complaining about having to learn to spell. They didn’t see the point—isn’t that what spell check on the computer is for? They were so disappointed when I reminded them of all the homonyms in the English language and pointed out that the computer doesn’t distinguish between words like there, their and they’re, so you have to know how to spell and when to use all three.

I’ll be applying that same logic when reviewing cutting instructions for the setting triangles in on-point quilts.

Leave a comment

Filed under designing, Electric Quilt, rotary cutting

Anatomy of a quilt design

I am not an artist. I have no formal art training and never considered myself to be one of those right-brain creative types. I love reading interviews of quilt designers and their explanations about how they create—what inspires and stimulates them—from nature, to childhood memories, to the shops they frequent, to the vacations they take, to the toys they played with, to the things they read and even their home furnishings. You learn about how they keep sketchbooks and a camera handy at all times or that they have a special collection in their home that kindles ideas. They have that inner “thing” that eventually culminates in a wonderful design.

In no way do I relate to any of that; I lack that inner “thing.” I just want my design to look good, use up my stash, and be doable.

So it felt weird to be asked to design a quilt back in 2010 when I worked at a local quilt shop, but after that first one came another and another. I have no idea how or why—no deep and meaningful explanations like the designers in the magazines point to—they just happened. Now my EQ7 file is stuffed with electronic sketches, and I wonder about my personal design experience often; I mean, who knew?

One of those ideas is for a spring quilt which got its start when I visited Rhonda in January. We spent a lot of time paging through some quilt books her aunt found for her at a yard sale for one dollar apiece. A project in one of the books featured this cool block:

block1

It consists of a 10″ center square surrounded by 16 flying geese units and eight half-square triangles. It’s a whopper at 20″ square.

I seriously considered this block, as the flowers in my focus fabric are large and would probably look good framed in this way. I scanned all the fabrics, colored the block with them

pink

yellow

and plugged the block into a layout:

quilt1

Epic failure—no explanation needed.

Maybe it needs sashing.

quilt2

Better, but not enough for me to like it. How about on-point?

quilt3

The blocks don’t look right.

A smaller quilt with fewer blocks might be the answer, but I had plenty of fabric and wanted to use as much as possible. I turned to my new (used) block book purchased during my Houston trip,

1001 Patchwork Designs book

found this block

block2

and plugged it into a layout:

quilt4

Okay, this is better, but it needs an interesting border:

quilt5

The border’s looking good. What if I added sashing and cornerstones?

quilt6

Ick. However, I like the additional green. What if I put green in the border?

quilt7

I like it, but don’t have enough green fabric.

What about using green only in the border corners?

quilt8

Great, I still don’t have enough green and now I don’t have enough of the small floral.

I changed the setting from 4 x 4 to 3 x 3 and put pink roses in the border’s corner squares.

quilt9

Now all I saw were unnecessary seams, which I hate. I realized that those seams could be eliminated if the top was pieced in diagonal rows, with the flower blocks being constructed as square-in-a-square blocks and alternating them with 4-patches, eliminating the need to work with whole lot of triangles, like this:

quilt10

And that’s my brutish, unrefined approach to design creation—mashing it around digitally until something pleasing emerges that also fits with my stash. Although, I confess to seeking and finding additional green to use in the corners. Don’t you hate it when you’re a half yard short?

18 Comments

Filed under designing, Electric Quilt

Less of Mr. Shingles and more block drawing

So Mr. Shingles is close to being locked back up in the closet. The anti-virals prescribed by the doctor finally started showing signs of kicking in late Wednesday, early Thursday and it was time to stop being miserable and get on with things.

To that end, I opened up my pieced drawing book from Electric Quilt yesterday

EQ book1

and blew through the last two lessons in chapter one. The chapter is only 28 pages, but contained 60 practice blocks, making the page count deceptively small. The last two types of blocks to practice using the PatchDraw method included kaleidoscope

patch draw kaleidoscope blocks

and octagon.

patch draw octagon blocks

The two were very similar, so it didn’t take long to draw all 12 blocks in both categories.

Here are some layouts with a couple of the octagon blocks:

octagon quilt1

octagon quilt2

Later this week I’ll show you my progress on the spring quilt I talked about a few weeks ago but which got interrupted by Mr. Shingles’ rudely unannounced visit. I count myself lucky to have caught it in time for the medication to work and for not having a severe case of this nasty condition. I realize it could have been a lot worse.

Thanks for visiting.

Leave a comment

Filed under Electric Quilt

Homework progress

Two months into the new year, and I’m still keeping up with my self-imposed rule to sew 10 Aunt Grace blocks per week:

AG140

and complete two drawing lessons per month in Electric Quilt:

patch draw eight point star blocks

This lesson covered LeMoyne stars, which I found much easier and more fun to draw than circles and arcs.

star quilt

Some of the blocks show seam lines between the star points. Adding them allows EQ to section the block more easily if you want to make the block using a paper foundation. The reason is clear, but if I ever was to attempt the block, I would try set-in seams, as I hate adding seams where they don’t need to be. Fewer seams make for a cleaner block appearance and enhance the structural longevity of the quilt (fewer places to come un-sewn over time).

As I wrote that part about fewer seams, I thought it might be time for me to attempt a LeMoyne star, so I did, and I documented my experience, which I will share with you tomorrow.

Leave a comment

Filed under Electric Quilt, piecing