Category Archives: thread

Crib quilt

Here’s the quilt for the newest member of the family and part two of my previous post titled Legacy and Heirlooms.

It felt incomplete to hand down bumper pads and a crib skirt with no quilt, so I dug out the leftover nursery fabrics and scanned everything into Electric Quilt in preparation for creating a layout.

There was enough of the main print in the collection to feature prominently in the layout, although I was bothered about having to build out each fabric image to get to a 9-inch block size.

I was worried about having enough leftover background fabric from my mom to cut the strips for these blocks. Thankfully, there was, but just barely.

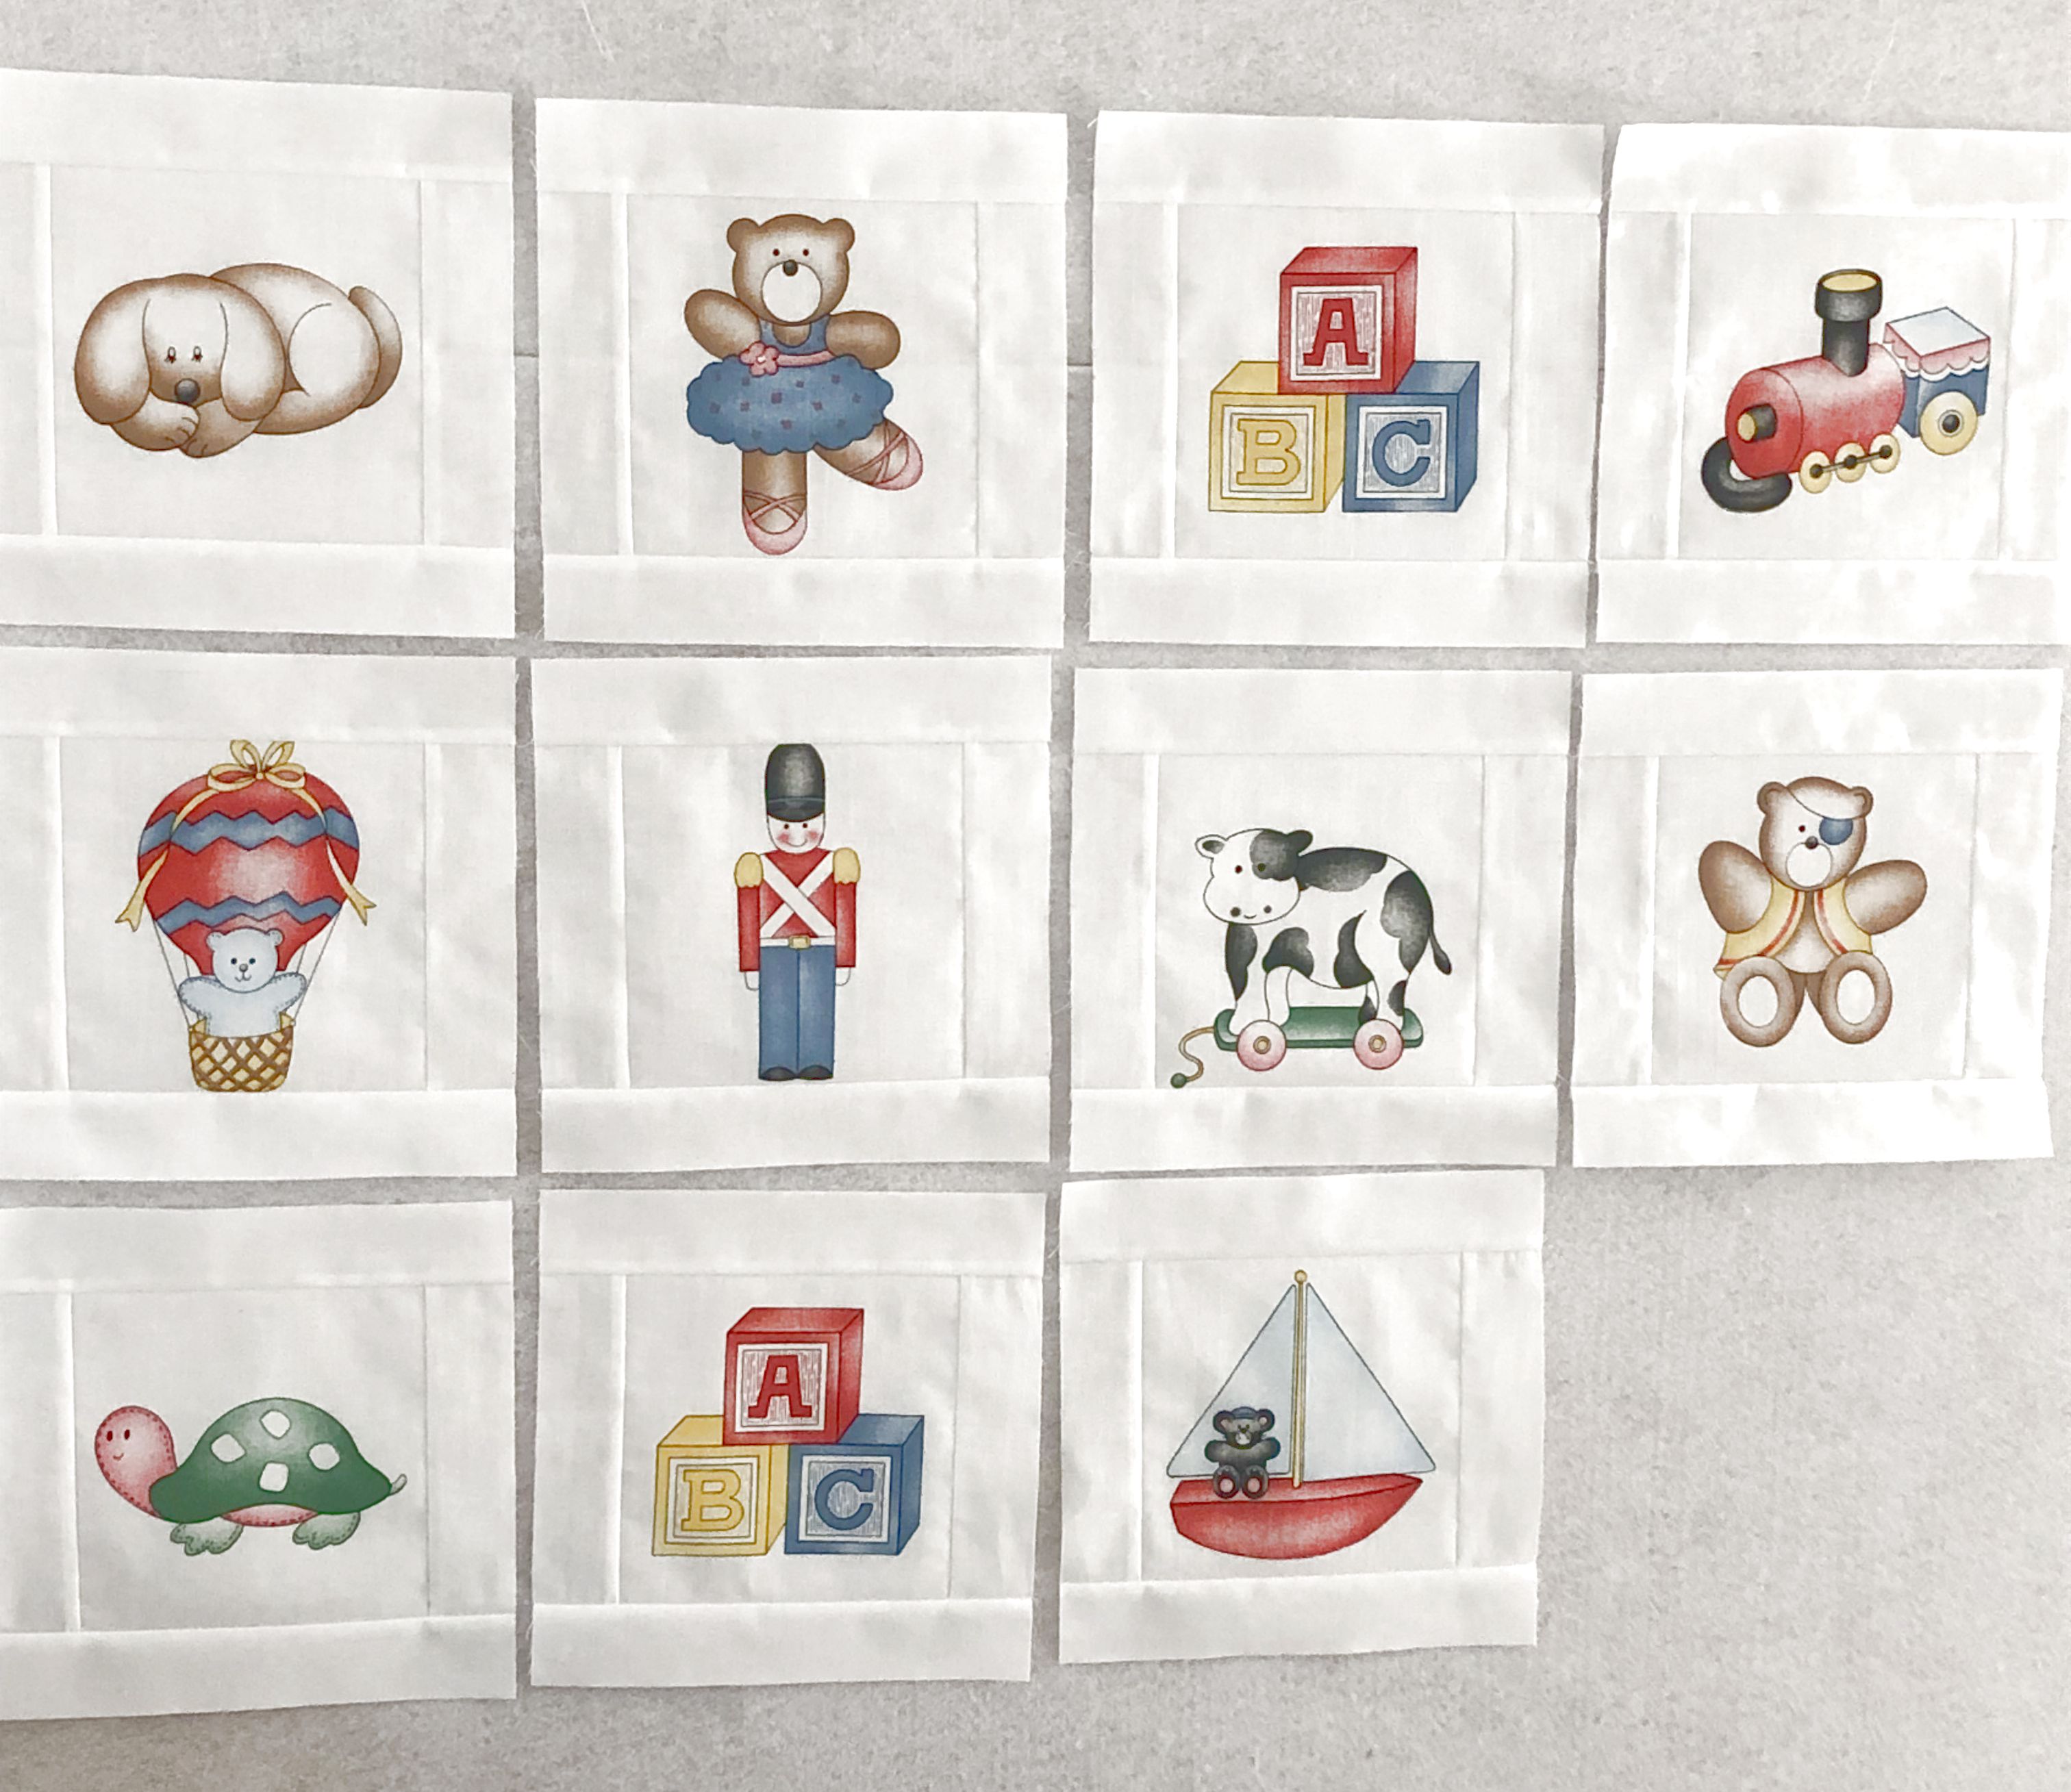
Also disappointing was that the border dots around each image were not available on all the scraps so it wouldn’t show in the final blocks.

There wasn’t enough of the two coordinating prints to make a cohesive-looking layout, so

I revised it to incorporate solids into the chain blocks. But what about sashing color?

John suggested gray. Then it dawned on me that instead of gray, a taupe color would be perfect, picking up the taupe used in the bears and the dog.

Three of the five colors were in my stash,

but I had no taupe and could not find a suitable red – a trip to the quilt store was in my future. I wasn’t excited about having to buy more fabric, but I wouldn’t need much and besides, you can justify almost anything when it’s for a new baby.

I was lucky to find a one-yard cut of matching white in my stash for the chain blocks and border which, despite its diminutive size, had to be pieced in five places. It was close and cutting mistakes were not an option.

Chain block construction took a lot of time because of the one-inch finished square size and the fact that they were not strip pieced.

To conserve fabric, I eliminated seams in the corner units.

The backing fabric is the same multi-colored pin stripe I used for The Bias Tape quilt.

This project was heavily quilted to help it survive countless washings, tugging, pulling, bunching and dragging: in the ditch with the walking foot, followed by free motion quilting elsewhere. The clam shell motif was added to the image blocks; it was fun and easy to quilt and provided sufficient coverage.

Five-pointed stars were quilted inside the chain blocks.

I struggled with the border quilting, walking away from the project for about 10 days out of frustration. I had the perfect thread (the wrapper even says so), a 17-weight, 100 percent cotton variegated in primary colors from Superior Threads. Oh, the tension issues!

I wanted to use cream colored thread in the bobbin and tried 50-, 40-, and 28-weight, each to no avail. In the end, my sense was that the difference between the weight of the two threads was too large to ever resolve any tension issues. I begrudgingly loaded a bobbin with the variegated thread and finished the quilting. I wasn’t thrilled with the way it looked on the back, but baby needed variegated thread! so I had to make it work.

I’m pleased to add my contribution to the crib set that my mother made 30 years ago. I truly hope that the quilt becomes a favorite and will be used and loved. If not, maybe it will become a favorite for a little someone in the next generation.

Next: Crib sheets

2 Comments

Filed under designing, Electric Quilt, machine quilting, piecing, thread

Triple finish

Done, done and DONE! Finally, I finished two UFOs and all eight Santa place mats. I hadn’t done any machine quilting since before we moved in 2014, so I chose smaller projects to ease myself back into the groove.

I admit, shame was the motivating factor for crossing the finish line, particularly since each of these projects was started around the turn of the century. First is the 42″ x 42″ Fences ‘n Firs wall hanging.

Designed by Susan Preglow and Cathy Slatterly, the pattern for this was featured in the January 2000 issue of McCall’s Quick Quilts.

I loved the scrappy nature of the design, but as a newbie quilter back then, I had no stash and no scraps, so I used fat quarters and standard, quarter-yard cuts to piece the top. Now, 17 years later, I can’t imagine my quilting life with no stash, although I could definitely embrace the no-scraps aspect of it!

Quilting this little project was an exercise in one step forward, two steps back. Besides not knowing for the longest time how to quilt the tree blocks, once I did figure it out, I ended up re-quilting all 12 of them because I hated the way they looked. The nylon thread I had used just didn’t look right, so I ended up using matching thread. Tension issues led me to quilt nearly half of them yet a third time.

On top of that, I’m hoping the stain in one of the rail fence blocks hasn’t permanently set in.

I’m not exactly sure how it got there; it’s possibly an acid stain from the packing paper the quilts were wrapped and stored in while we moved and built our house. More likely, it was caused by a Texas cockroach (no amount of pest control keeps them ALL away). Disgusting, I know.

The backing is pieced with leftovers from the top:

I used a simple cable design for the border:

Here’s a look at the free motion machine quilting of a tree from the back:

and a maple leaf:

The vertical lines running through the leaf are the ditch quilting lines inside the rail fence blocks.

My machine quilting is definitely improving, but I still find it intimidating.

My second finish is this simple, 46″ x 54″ quilt:

There must’ve been a perfectly good OCD reason for the last square in the bottom row to be red instead of blue, but so much time has passed, I don’t remember what it was.

The squares are quilted with diagonal lines spaced two inches apart and the sashing strips and border are quilted with a single cable design.

It’s made with Aunt Grace Christmas prints, which were available between 1996 and 2001.

Check out these vintage cuties:

Here is the backing fabric:

The only two places I could have bought these prints is Houston or a little shop in Estes Park, Colorado. The striped fabric used for the binding was purchased at the Houston Quilt Festival in the early 2000s.

Completing the binding for all eight Santa place mats is the third and final finish. Here they are with their matching table runner:

Although the curved edges in this project required it, I discovered that I’m not fond of working with bias binding!

It feels good to say “done,” but there’s still a lot on the list, so I’d best keep on keepin’ on.

Thanks for checking in!

Leave a comment

Filed under binding, borders, Christmas, fabric, machine quilting, quilting, scrappy backs, thread

In my infinite brilliance, let the duh fest begin or: how not to make a quilt back

Today, I have a couple tips for piecing a non-scrappy quilt back.  But first, the ditch quilting for Cocheco Memories is coming along, despite chronic fights with a certain spool of red thread.

red

I like machine quilting with Presencia thread, but boy, did I get a lemon of a spool in #284 red. It’s breaking a lot and dragging through the machine so much I thought there was something wrong with my tension discs. It even feels hard. None of the other Presencia spools I’m using are behaving poorly,

CM quilting thread

so I’m chalking it up to a quality control issue with that spool, but hey, Presencia people, you owe me a spool of #284 for all the grief I’ve put up with in the last week!

Quilt backs wider than 40 inches must be pieced. The Cocheco Memories quilt (before I, in my infinite brilliance, changed the border width at the last minute) needed a back that measured 67″ x 67″. I would need two lengths of 1⅞ yards each. I rounded up and purchased a total of 4, thinking that would be more than enough.

When I decided, in my infinite brilliance, to widen the border, I completely ignored the impact of a size increase on the back. So when I got ready to piece the back and realized I only had 4 yards—uh oh….

Duh.

backing5

I now needed a 71″ x 71″ back and had enough yardage for two 72″ lengths—ugh! As you can see in the photos below, close doesn’t even begin to describe it.

Bottom.

Bottom.

Top.

Top.

Here’s how I put together the backing:

Position the two panels right sides up next to each other to make sure the print is oriented in the same direction on both. This was really important for my backing since the fabric I chose was directional.

Tear off the selvages along the inside edge of each panel where they will be sewn together. To do this, make a 1″ snip about ½” to 1″ from the edge of the selvage and tear. Tearing will give you an on-grain edge which means it will be straight and yield a nice, un-puckered seam line.

backing1

Press the torn edge on both panels.

backing2

Align the torn edges and pin.

backing3

Using a presser foot with a wide footprint, sew the two panels together using a ½” seam allowance and a slightly elongated stitch length. (I enhanced the visibility of the ½” marking on my throat plate with a piece of blue painter’s tape.)

backing4

Press the seam allowance open.

As you would expect, layering this quilt took extra time because of my teeny-tiny back. I ended up basting around the perimeter to hold things in place and make sure there would be three layers to trim when it’s time for binding.

basting

Hopefully, my infinite brilliance won’t surface again for good long while.

3 Comments

Filed under machine quilting, piecing, thread

ADD or plain ol’ burn out?

This always happens. After a marathon of machine piecing resulting in the completion of a quilt top and/or backing, I must step away from it. I’m never quite sure if it’s my ADD tendencies or if I’m just tired of looking at it—probably a little of both.

This weekend, I ignored the blue/white lawn chair quilt and scooped up another batik quilt for which I have created a pattern—yes, for sale, some day—if I would just finish the sample!

The quilt is 72″ square and assembled with 36″-square quadrants. After ditch quilting along every seam, I free motion quilted this design on the top:

This design comes from Volume VII of Quiltmaker's digitized quilting designs and Electric Quilt.

This design comes from Volume VII of Quiltmaker’s digitized quilting designs and Electric Quilt.

with this yummy 3-ply, 40-weight, all-cotton variegated thread

King Tut thread

The color changes occur about every 1½”, and I’m using it on the top and in the bobbin.

Although the spool label recommends a size 90/14 needle, I’m successfully using an 80/12 with no breaking, shredding or skipped or uneven stitches.

Railroad Ties machine quilting

The quilting motif measures about 17″ square to fit four per quadrant. Here is my next one ready to go:

ready to quilt

Leave a comment

Filed under Electric Quilt, machine quilting, thread

Science alert: matching gene discovered

NOTE: If you’re interested, click on the ABOUT tab to view a couple photos of our boys when they were little.

I’ve mapped out a quilting strategy for the lawn chair quilts: all straight lines done with the walking foot.

lawn chair quilting

After much deliberation, I decided against variegated thread and .004 nylon thread and bought these spools of 50-weight, 100 percent cotton, 3-ply Presencia thread for quilting. I needed a large assortment to match 20 different fabrics. Now that I’m thinking about it, the matching thing is so my mom. It all makes sense now. Clearly, the matching gene is encoded in my DNA, passed along from her.

blue thread

Quilting with this thread is easy. It’s strong, behaves nicely and looks fantastic. After staring at all the spools in this photo, it occurred to me that I just might be on my way to becoming a thread junkie.

1 Comment

Filed under kids, machine quilting, Mom, thread

What about the ditch quilting?

One thing I neglected to mention in my first post was that before doing any free motion quilting, I always ditch quilt everything—okay, not everything—but still, a lot–with my walking foot. This serves two purposes:

  1. It anchors the layers together in preparation for free motion quilting.
  2. The more heavily quilted it is, the longer the quilt will hold up to wear and tear, particularly that imposed by a child.

Since this was going to a boy (and I know boys!) I wanted the quilt to withstand lots of tugging, dragging and washing without the batting clumping together caused by too much space between quilting lines.

ditch quilting

The black dashed lines superimposed on the above photo indicate where I quilted in the ditch: not only between all the rows and columns, but also within all the blocks and along both borders. (Note: I did not mark every single line of ditch quilting, just the basic areas so you get the idea.)

For the ditch quilting, I used 50-weight, 100 percent cotton Presencia thread in matching colors. I used the same weight and brand of Presencia in the bobbin, but in a cream color to blend with a multicolored print on the back.

Presencia thread

I love this thread for machine quilting, not only for its strength, but also because it just looks pretty.

Okay, the next post will cover borders.

Leave a comment

Filed under machine quilting, thread

Quilting an Overall Design on a Baby Quilt

Welcome to my very first blog post! I want to tell you about the baby quilt I finished just before Christmas.

It was exciting to learn last summer that my niece was expecting a baby boy in October. I had been looking for a reason to make this quilt, Nap Time, featured in issue #68 of Quiltmaker magazine after my friend received a quilt made from this pattern, and now I had one.

Image

In early June, I drove to my favorite quilt shop and spent a couple hours selecting fabrics for the top.

Image

Six days later the top was finished. With the piecing frenzy over, I needed a break, so into the closet it went. Still, I was happy because I’d had so much fun choosing fabrics and making it, plus there was still plenty of time to finish it.

Fast forward to September. Choosing a quilt motif for this design would be a challenge. Because the block is a rectangle and most block stencils are square, I decided to try an overall design.

The folks at Electric Quilt have digitized hundreds of quilt motifs from Quiltmaker magazine. The design I liked was in Volume 7.

Image

EQ allows you to size a motif to your quilt layout.

Image

Next, I printed it in sections, in this case, 12 sheets of 13″ x 19″ paper. All the sheets come with registration marks so you can tape them together like this:

Image

While assembling the sheets, I noticed that some of the connections in the design were not as smooth and rounded as they should have been (maybe because the size of this motif was pushed to its limit?)  so I added a spacer sheet in between the rows and hand drew the connections so they would look better.

Image

After taping everything, I reached for this product:

Image

It’s lightweight water-soluble stabilizer, typically used for machine embroidery, but I use it to transfer quilt designs to avoid marking directly on the top. I purchase it online by the bolt from a big box retailer. You get 25 yards in a 19½” width.

The quilt top (minus the outer blue border) measured 38″ x 50″, so I cut three 42″ lengths and sewed them together on the machine using a ½” seam allowance and a long stitch length.

I taped the top portion of the printed design to the cutting table and then taped the sheet of sewn-together plastic on top. Using a black ultra fine point permanent marker, I began tracing the design onto the plastic.

Image

Once the top portion was traced, I removed the tape holding the paper to the table and slid everything up to trace the middle section of the design and once more for the bottom section.

Image

Once the design was all transferred, I pinned the plastic sheet to the layered quilt top in preparation for free motion quilting.

Image

Image

I quilted it with this thread: a 30-weight variegated cotton in three shades of blue.

Image

I made only minor tension adjustments when using this heavier weight thread (top and bobbin). My first experience with it was positive; it behaved quite nicely and complemented the top well.

Image

Next post will show how I did the border design. Thanks for reading!

5 Comments

Filed under Electric Quilt, fabric, machine quilting, thread