Category Archives: quilting

A year-end finish

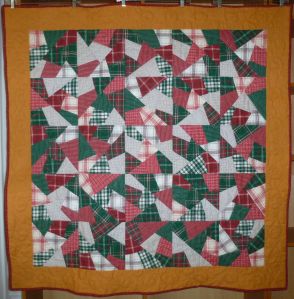
I finished a UFO started in 2003. The crazy quilt pattern was pieced with a bundle of red, green, and white homespun fat quarters purchased from can’t-remember-where.

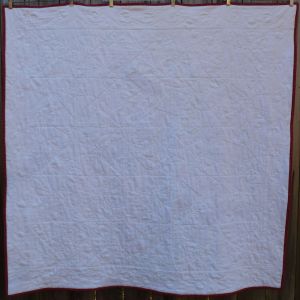
Years later, I regret the gold border, wishing I’d used the same white for it that was used for the back.

But, what’s done is done and I pulled this one out of the closet because, at 54 inches square, it was the perfect size for practice quilting on my new Q-20.

Ditch quilting was done between all the rows and columns, as well as between all the patches. Overlaid onto that was a continuous quilting design of large, gentle curlicues.

The border curlicues mimic those in the top, but with a much tighter curve.

Those tight curves caused the fabric to bunch up quite a bit inside them, so much so, I re-quilted the entire border. Although better, the second attempt was still not quite to my satisfaction, but there comes a point where you must declare “done”.

If I ever quilt this border design again, instead of pin-basting the border layers, they will be generously thread basted to keep everything as flat and smooth as possible to minimize puckering.

The binding fabric was generously donated by a dear quilting friend in Colorado.

Perfect!

While I have plenty of red and green homespuns in my stash, all are quarter-yard cuts, not nearly enough for 200-plus inches of binding. I so appreciate her contribution, as quilt shops in the Houston area are drying up (we just lost another one this month) and shop owners here have never been inclined to carry much, if any, of that type of fabric.

Thanks for checking in. Hope your New Year’s celebration is merry, fun and safe!

2 Comments

Filed under binding, borders, Christmas, quilting

More quilt motif decisions and a raspberry tart

After a lot of pondering and playing, I finally settled on the quilt motifs for a top in my UFO pile, which was made from a pattern called Kwik Krazy Quilt.

My quilting strategy is to ditch quilt between

  1. all the rows and columns
  2. the blocks and the border(s)
  3. major patches in the blocks

Once the layers are stabilized with the ditch quilting, the free motion quilting designs are added. While it is time consuming and a tad boring to add that much ditch quilting to a project, I feel better knowing that the quilt has a better chance of not coming apart after a few years and wash cycles.

In the meantime, I found some beautiful raspberries at the store last week, so I made my very first tart:

While paging through my cookbooks and searching the web for recipes, I was amazed at the huge variety of crust and filling options. I finally settled on a shortbread crust

and a French pastry cream for the filling.

John said that was a good combination and gave it a big thumbs up.

Thanks for stopping by!

2 Comments

Filed under home cookin', quilting

The Wizard of Oz quilt

Scroll down to see other photos of the quilt if you want to skip the backstory.

One of my favorite movies is Wizard of Oz. Those of you old enough may remember that CBS used to broadcast it once a year on a Sunday night in early spring. I never missed it. I loved the melodies, the clever, rhyming song lyrics, the tornado, the Lollipop Guild, the Lullaby League, the characters – always partial to the tin man – and oh, that wicked witch with her menacing green face, flowing black cape and fear inducing cackle. MGM and Margaret Hamilton did her well.

It’s no secret to people who have known me for a long time that I love all things Wizard of Oz, so it’s curious to think about my hodgepodge collection of Wizard of Oz paraphernalia and realize that none of it was acquired directly by me.

Co-workers would randomly bring me items like this Whataburger glass from 1989 celebrating the movie’s 50th anniversary:

Other office mates found this T-shirt and ruler:

John gave me this collection:

My brother and niece picked up this collection of Wizard of Oz PEZ dispensers:

Can’t remember who gave me this witch ornament:

In 2007, after seeing the advertisement for Quilting Treasures’ Wizard of Oz fabric, I had to add a quilt to the collection. I was giddy with excitement upon learning that my favorite quilt shop was carrying ALL the prints in both collections. One contained images from the black and white Kansas portion of the movie, the other had full color images of Munchkinland, Emerald City, the yellow brick road, scarecrow, lion, tin man and Glinda. After seeing all the prints in both collections, I chose the Kansas fabrics, never being open to making two Wizard of Oz quilts.

There was a pattern online, but I wanted to create my own, so I pondered over yardage amounts for at least a couple of hours to make sure I would have enough of each of the fabrics. Any leftovers would be used for a pieced back.

The images for the square-in-square-in-square blocks came on a panel and dictated the finished block size.

A gingham, a floral and a basket print were used for the outer squares in rows 1, 3 and 5.

An abundance of fussy cutting was required due to the way the images were arranged on some of the fabrics. For this block, I debated about whether to cut the patches so that Toto was always at 90 degrees or to ensure the basket print would run straight across the patch. I chose the latter because I thought it would look too dizzying and chaotic to have the background running in all directions.

Fortunately, the gingham pattern was printed on the fabric at 45 degrees, so all the patches with it could be cut on the straight of grain rather than the bias.

Quilt stats:

  • 11 fabrics
  • 52 fussy cuts
  • 51″ x 61″
  • 9″ blocks
  • 1″ sashing strips and cornerstones
  • ½” inner border
  • 5¼” outer border

I used my new Bernina Q20 to quilt the border motif, and while it took some getting used to, I am mostly pleased with the results. There are a few spots that I should probably redo, but since they aren’t too awful, I opted to finish rather than fuss.

My free motion quilting strategy has always been slow and steady in order to achieve the most consistent stitch length. But the vibe from a machine with a stitch regulator is something I’ve not been accustomed to, so it helped to dial way down the Q20’s speed for this project.

So happy it’s done! Thanks for stopping by.

2 Comments

Filed under quilting

Hacking, messing, fussing and quilting

I’ve been trying to finish my Wizard of Oz quilt, which was cut and pieced shortly after the fabric hit the quilt shops in late 2007, early 2008. By the time we moved back to Houston in 2014, the ditch quilting had been completed. A year ago, it was pulled out of the UFO heap to tackle the free motion quilting portion of it and it’s still not done. Fitting the chosen quilt motifs has slowed down progress, but I think I’m finally over the hump because the quilt is nearly ready for binding. In the meantime, here’s a look at all the fussing:

This was the original quilting plan:

I started with the Autumn Breeze motif, which was intended for three of the rows containing square-in-square-in-square blocks. To better fit the motif inside the block, I printed it in two sizes, combining the inner curlicues from the smaller size with the larger sized outer curlicues.

This motif turned out to be a dud:

After quilting all four blocks with it, I ripped out all the stitches because the design didn’t fill the block well, plus the corner loops were too small, even after my feeble attempt to enlarge them.

I finally settled on a stencil with the pumpkin seed motif in the corners and curved, crisscrossing lines filling the rest of the square. I had to reduce the size of the corner motif so it would fit better, but in the end, this motif was a huge improvement over the other one.

This wavy lines motif was chosen for the other four blocks in rows 2 and 4 to break things up. The only thing I did beyond sizing it was to flip it for two of the blocks.

The borders presented yet another challenge. Once I had the corner section sized, flipped and rotated so it looked good in the space,

there was the challenge of dealing with the collision of the sections in the middle.

How to fill that space????

After much tracing, doodling, fussing with French curves and lots of erasing, there was only one solution left, which was to fill the space with a single, large curlicue.

The opposite borders were handled the same way, but with the curlicue going in the other direction.

More photos to come next month. Stay cool out there and thanks for checking in!

Leave a comment

Filed under quilting

Triple finish

Done, done and DONE! Finally, I finished two UFOs and all eight Santa place mats. I hadn’t done any machine quilting since before we moved in 2014, so I chose smaller projects to ease myself back into the groove.

I admit, shame was the motivating factor for crossing the finish line, particularly since each of these projects was started around the turn of the century. First is the 42″ x 42″ Fences ‘n Firs wall hanging.

Designed by Susan Preglow and Cathy Slatterly, the pattern for this was featured in the January 2000 issue of McCall’s Quick Quilts.

I loved the scrappy nature of the design, but as a newbie quilter back then, I had no stash and no scraps, so I used fat quarters and standard, quarter-yard cuts to piece the top. Now, 17 years later, I can’t imagine my quilting life with no stash, although I could definitely embrace the no-scraps aspect of it!

Quilting this little project was an exercise in one step forward, two steps back. Besides not knowing for the longest time how to quilt the tree blocks, once I did figure it out, I ended up re-quilting all 12 of them because I hated the way they looked. The nylon thread I had used just didn’t look right, so I ended up using matching thread. Tension issues led me to quilt nearly half of them yet a third time.

On top of that, I’m hoping the stain in one of the rail fence blocks hasn’t permanently set in.

I’m not exactly sure how it got there; it’s possibly an acid stain from the packing paper the quilts were wrapped and stored in while we moved and built our house. More likely, it was caused by a Texas cockroach (no amount of pest control keeps them ALL away). Disgusting, I know.

The backing is pieced with leftovers from the top:

I used a simple cable design for the border:

Here’s a look at the free motion machine quilting of a tree from the back:

and a maple leaf:

The vertical lines running through the leaf are the ditch quilting lines inside the rail fence blocks.

My machine quilting is definitely improving, but I still find it intimidating.

My second finish is this simple, 46″ x 54″ quilt:

There must’ve been a perfectly good OCD reason for the last square in the bottom row to be red instead of blue, but so much time has passed, I don’t remember what it was.

The squares are quilted with diagonal lines spaced two inches apart and the sashing strips and border are quilted with a single cable design.

It’s made with Aunt Grace Christmas prints, which were available between 1996 and 2001.

Check out these vintage cuties:

Here is the backing fabric:

The only two places I could have bought these prints is Houston or a little shop in Estes Park, Colorado. The striped fabric used for the binding was purchased at the Houston Quilt Festival in the early 2000s.

Completing the binding for all eight Santa place mats is the third and final finish. Here they are with their matching table runner:

Although the curved edges in this project required it, I discovered that I’m not fond of working with bias binding!

It feels good to say “done,” but there’s still a lot on the list, so I’d best keep on keepin’ on.

Thanks for checking in!

Leave a comment

Filed under binding, borders, Christmas, fabric, machine quilting, quilting, scrappy backs, thread

Turn of the century projects

The 21st century, that is….

I’ve been busy dividing my time between several fairly old projects, ones that I started back in the late 1990s/early 2000s when I was brand new to quilting. The guilt about having so many UFOs in the closet, combined with the realization that I have fewer days ahead of me than behind, has spurred me into action.

First, though, here’s the sweater quilt, although it probably doesn’t fit the legal definition of a quilt since there is no batting—just a top and a flannel back.

I’m hand stitching the two layers together and it’s now more than two-thirds finished. My poor little paper pounce pattern is looking so abused, I hope it holds out so I don’t have to make another one.

Because the two layers are so bulky, my hands can only push the needle in and out for so long before they need a rest. I’m averaging about four rows a week, factoring in both hand fatigue and the monotonous nature of a running stitch.

I’m fortunate enough to have a sewing space where I can leave the sweater quilt draped on the cutting table, so it’s ready to work on whenever I am. Sometimes I’ll add a few stitches if I’m just walking by on my way to doing something else. Those little bits of stitching are adding up to a whole lot!

In February, I pulled out an unfinished Aunt Grace Christmas top I had made around the turn of the century—gosh, it feels weird to say that! I don’t remember the exact year, but Eric, now 23, must’ve been around six or seven at the time. I quilted it, made the binding and stitched it to the quilt. I still have to hand sew the binding to the back, but it’s almost done—yay!

Matching those tiny stripes took an entire evening, but I would have lost sleep had they not been.

Continuing with a variety of tasks to avoid boredom, I also decided to quilt a fall themed wall hanging I had made, again, around the turn of the century. To avoid cutting into a bed-sized batt for a twinky little 32 x 32 piece, I spliced together three batting scraps the old fashioned way, with curved piecing and a herringbone stitch.

It was a pain, but supposedly, the curves help to better disguise the splicing as opposed to the break line or ridge that could appear if done with a single, straight cut.

Lately, I’ve been machine quilting a single maple leaf motif to the rail fence blocks in a medium sized wall hanging begun in the early 2000s.

Here’s the layout:

The amount of quilting I’ve planned for this one seems disproportionate to its size, but I’m not sure where I would eliminate any, so I push on.

The border is all sized and ready to go, but I cannot figure out how to quilt the tree blocks, despite having more than a decade to figure it out. In the meantime, I’m open to suggestions.

That’s all for now. I’d better get back to it.

Leave a comment

Filed under batting, quilting, sweater quilt

The stabilizer saga

Things are back to normal after two weeks with family. I always enjoy when my brother and niece come to hang out with us.

After finishing the Aunt Grace quilt top, I wasn’t sure what to work on next. Instead of turning to something new, I pulled a small, fall themed, appliqued wall hanging out of the closet to prepare it for quilting.

First, a little backstory: My go-to product for transferring quilting designs to quilt tops is water soluble stabilizer. Two years ago in September, after quilting an overall design on my niece’s baby quilt (click here to see how) I emailed the Sulky Corporation to ask if Solvy was available in a wider width. Stitching together three wispy sheets of plastic to get a size large enough to cover the entire quilt was a pain, so my hope was to purchase a larger width, if available, to save time and effort.

A very nice company representative emailed right back to say that the product was, indeed, available in a wider width (double what you can buy off the bolt) and all she needed was a tax ID number so she could process the order.

Huh?

Now I was faced with visiting my local government to establish a business to obtain a tax ID number to place a one-time order. Great.

The woman I spoke with at the city building was very nice and in short order figured out why I wanted to initiate the paperwork. She said (and I’m paraphrasing here since this happened nearly two years ago), “You would not believe how many people do exactly what you’re doing just to get a vendor to sell them something.” She kindly questioned whether there was any other way to obtain the product, and while she didn’t refuse me the paperwork, she strongly encouraged me to be as resourceful as possible to go another way. She added, “What happens is that an individual will set up a company to get their desired item, and then the city and state end up with a bunch of business/tax entities on their rolls that remain dormant and inactive forever.”

Oh.

I thanked her for her time and on the drive home, decided on a new tactic:

Begging.

I sent the nice representative at Sulky a detailed email explaining my local municipality’s reluctance to issue a tax ID number for a one-time event.

I explained how I used their product and how a wider width would make things so much easier.

I attached photos of my niece’s partially quilted baby quilt, covered in Solvy.

I offered her payment with a credit card.

It worked! She emailed back that someone would contact me to arrange payment and shipping.

So here is my 110–yard roll of 39″-wide Solvy:

Sulky roll 

The fall wall hanging measures 28 inches square, which would require two pieces of the 19½”-wide stabilizer that comes on the bolt, so I turned to my roll and cut a 30-inch piece off of it. Easy.

Then I drew the blocks and border, traced around the applique templates and added the quilting lines.

transfer1

For the inner border, I traced a stencil pattern, reduced it on the copier/printer

border stencil

and fit it into a paper mockup of the actual border.

border final

Since the stem on the pumpkin in the upper left corner faces a direction opposite that of the other three, I extended the asymmetry of that block by running the diagonal lines in the opposite direction from those in the other blocks.

transfer2

Although, once I saw how the lines formed a V when they came together between the top two blocks, I decided they should be quilted the same as the other three. It was worth a shot. 

A Pickett curve set came to the rescue when it was time to create the lines in the pumpkins and the veins in the leaves.

Pickett

I’m still debating how to mark the border: echo quilting, straight lines or something else?

Leave a comment

Filed under quilting

Patchwork progress

Lately, I haven’t posted all that frequently, but I have been working on quilting projects, in between house cleaning, tending to a high school senior and baking for Eric. If you’ve been following the story of Eric’s Christmas packages, they finally arrived in Afghanistan after Christmas. Meanwhile, in response to my request for an update on their delivery status, the post office emailed me a link to their customer service survey with a request to fill it out.

Huh?

Three or four days later, I finally received a form letter in my inbox explaining that mail for overseas military members goes into a ginormous black hole so no one can be accountable—well, that clears things up nicely, doesn’t it?

box1

We packed two more boxes of snacks and other items to send, hoping that now that the Christmas rush is over, it will take less time for them to reach their destination—why did I just say that after what I wrote in the first paragraph above? I suppose my head needs examining now.

One of the boxes has four loaves of quick bread: two apple, two pumpkin, which I hope Eric will share with his maties (I know that’s not a word, but it sounds cute, so I’m going with it).

box2

At our TSA meeting on Tuesday, I finished stitching the binding onto my Christmas tree table runner:

table-runner2

I increased the amount of quilting on the tree trunks, and I think they look much better with more.

I increased the amount of quilting on the tree trunks, and I think they look much better with more.

I completed two more sets of rows on my scrappy 1930s quilt. I really, really like the way it looks but don’t think I’ll take on another one of this kind.

scrappy 30s progress

You sew and sew and sew to get your 4-patch, you sew and sew and sew to get your 6-patch, then you sew and sew and sew to put bunches of them together and four hours later you have a row. Then you get to pin match 30-plus seams and sew some more and hope this doesn’t happen:

mistake

3 Comments

Filed under binding, Christmas, piecing, quilting