Part of this week was devoted to repairing two quilts, labeling one, and creating a hanging sleeve for another.
I made this I-spy-ish quilt in 2001 for our younger son,
who, deviously took a pair of scissors to the binding, resulting in this:
My exasperation upon discovering it soared to 11 and resulted in a flood of tears. After 20-plus years, I finally pulled the quilt out of storage to make the repair.
I applied some Fray Check to both sides of the cut on the border and then the back.
Next, I pulled thread to match the border and backing fabrics and set the sewing machine for a zig zag stitch.
The stitch width was set to the maximum allowed while the stitch length was shortened to around .5 – close to settings needed to create a satin stitch, but not quite.
With fingers crossed, I pulled out my box of scraps and found two pieces of leftover binding fabric way down at the bottom.
I trimmed the section of binding that had been damaged by the cut, inserted the new section, joined the ends, and reattached the binding to the quilt.
That tiny cut, which measured just 3/16″ x 3/8″ and took all of one second to do, required the un-sewing and resewing of 21 inches of binding and about three hours of time. Thinking about it in that context probably explains why I’ve avoided repairing it all these years.
I made this quilt 10 years ago
and for whatever reason, never made a label, so I got busy and checked that task off the list.
The little tulip wall hanging I made during Covid needed a hanging sleeve.
It’s basted into place in preparation for stitching it down while watching Casablanca or another Humphrey Bogart movie we have saved on the DVR.
And finally, there’s this lap quilt, Bricks and Blocks, which was my first finished quilt.
Some of the quilting stitches were coming out so I pulled out the walking foot and fixed them. The only task remaining is to cross stitch and attach a label for it, after which I can turn my attention back to creating new quilts. Thanks for stopping by!
If you surf the internet for quilts, you may have seen the original quilt with this design from Beech Tree Lane Handmade. It was love at first sight for me: simple but cute, this scrappy sea of 4-inch half square triangles would be easy and so satisfying to make.
This quilt turned out to be one of the most planned – and shopped for – quilts, ever. Long before this pattern came into my radar, I already had a nice collection of Aunt Grace 1930s reproduction fabrics, but things changed in 2017. After seeing an eBay listing for early (1991 – 1996) Aunt Grace prints I didn’t have, I became a collector almost overnight. Today, I don’t even remember why I was on eBay at the time.
Over the next few years, I regularly searched eBay and Etsy for Aunt Grace and other, select 1930s reproduction fabrics, like these from Maywood Studio’s Just Makin’ Conversation collection.
Buying opportunities increased with the onset of Covid and its protracted presence in 2020 and 2021, with vintage Aunt Grace fabric coming out of the woodwork, and I scooped up a good chunk of it during that time.
Initially, bidding on auctions, making offers, requesting shipping refunds, etc. generated plenty of anxiety, but waned as I became more familiar with the process. The one exception was sniping and admittedly, there were more than a few heart-pounding auctions I’d rather forget.
One disadvantage of auctions is that you end up with fabric you don’t want in order to acquire the fabric you do. This is because sellers often create 8-, 9-, or 10-yard bundles to move a substantial amount of fabric out the door in one sale. To deal with all the unwanted prints, I was resigned to set up a seller’s account on eBay to push them back into the marketplace as quickly as possible. All said and done, I re-sold close to 100 yards. It was a gigantic pain, but worth the effort.
eBay listing
I learned early on to check each fabric purchase against its listing description. For example, an item may be labeled a fat quarter, but its actual dimensions fall short or an item may be missing from the bundle or contain stains that were not visible in the listing photo. The good news is that I’ve never run across a seller who wasn’t anxious to make it right.
I also learned to use extra caution when reviewing Aunt Grace fabric listings because many sellers annoyingly use “Aunt Grace” in their description, even if the fabric did not originate from Marcus Brothers’ Aunt Grace designer Judie Rothermel.
To verify if a fabric was, in fact, a true Aunt Grace, these swatch books came in handy, allowing me to bypass sellers using the term Aunt Grace as a generic instead of a proper noun.
My original plan was for an 18 x 20 layout, using each print only once. As the top was being pieced, I continued adding Aunt Grace prints to my collection, and as it neared completion, I realized that I was 8 to 10 prints shy of growing the layout to 19 x 22.
Not wanting any of those hard-won prints to go unused and not opposed to making the quilt bigger, I continued the hunt for more Aunt Grace fabric, constructing new half square triangles as it trickled into the house.
To maintain consistency in the pressing direction of the seam allowances, I rejected the option of adding an entire column to the right side of the existing top. Doing this would have resulted in a long, vertical stitching line interrupting the downward pressed direction of the seam allowances between each row. Instead, I ripped out about 3 inches of the stitching between each row, added the new half square triangle and resewed the seam to rejoin the rows. This also allowed the seam allowances for the triangles in columns 18 and 19 to be pressed toward the darker print.
These light fabrics from my stash were perfect for pairing with the Aunt Grace prints:
They were a good start, but since I love using lots of different fabrics for a truly scrappy look, I searched online for similar shirting style prints and additional colors, adding these:
In the meantime, just before Christmas last year, this set of 15 half-yard cuts appeared on Etsy and I snatched them up.
All were from Robert Kaufman’s Hints of Prints collection, several years old and no longer available in quilt shops, but perfect for this project. Although I didn’t use all of them, I was especially grateful to add another couple of purples (a hard-to-find color in this genre) to the shirting mix for this quilt.
I found and purchased yardage of one of the prints from this collection to use for the backing. It was on sale for $8.00 per yard, so I bought what was left – enough for the back and some extra for my stash.
I followed the original maker’s quilting plan, which consisted of ditch quilting between the rows, vertical quilting on both sides of the stitching line between each column, and on both sides of the diagonal created by the triangles.
This cute, petite floral print on a reproduction blue background was used for the binding.
The batting in this quilt is Cotton Blossom from Mountain Mist. It is far and away my favorite, and sadly, no longer available. It was sold at the quilt shop in Colorado where I worked, and I was hooked on it immediately after finishing my first quilt with it. Thin, light weight and easy to machine quilt, it produces the soft and cuddly feel I truly love in a finished quilt.
I’m pleased with the way this quilt turned out and look forward to creating its sister quilt with the remaining triangle halves.
I finished a UFO started in 2003. The crazy quilt pattern was pieced with a bundle of red, green, and white homespun fat quarters purchased from can’t-remember-where.
Years later, I regret the gold border, wishing I’d used the same white for it that was used for the back.
But, what’s done is done and I pulled this one out of the closet because, at 54 inches square, it was the perfect size for practice quilting on my new Q-20.
Ditch quilting was done between all the rows and columns, as well as between all the patches. Overlaid onto that was a continuous quilting design of large, gentle curlicues.
The border curlicues mimic those in the top, but with a much tighter curve.
Those tight curves caused the fabric to bunch up quite a bit inside them, so much so, I re-quilted the entire border. Although better, the second attempt was still not quite to my satisfaction, but there comes a point where you must declare “done”.
If I ever quilt this border design again, instead of pin-basting the border layers, they will be generously thread basted to keep everything as flat and smooth as possible to minimize puckering.
The binding fabric was generously donated by a dear quilting friend in Colorado.
Perfect!
While I have plenty of red and green homespuns in my stash, all are quarter-yard cuts, not nearly enough for 200-plus inches of binding. I so appreciate her contribution, as quilt shops in the Houston area are drying up (we just lost another one this month) and shop owners here have never been inclined to carry much, if any, of that type of fabric.
Thanks for checking in. Hope your New Year’s celebration is merry, fun and safe!
Done, done and DONE! Finally, I finished two UFOs and all eight Santa place mats. I hadn’t done any machine quilting since before we moved in 2014, so I chose smaller projects to ease myself back into the groove.
I admit, shame was the motivating factor for crossing the finish line, particularly since each of these projects was started around the turn of the century. First is the 42″ x 42″ Fences ‘n Firs wall hanging.
Designed by Susan Preglow and Cathy Slatterly, the pattern for this was featured in the January 2000 issue of McCall’s Quick Quilts.
I loved the scrappy nature of the design, but as a newbie quilter back then, I had no stash and no scraps, so I used fat quarters and standard, quarter-yard cuts to piece the top. Now, 17 years later, I can’t imagine my quilting life with no stash, although I could definitely embrace the no-scraps aspect of it!
Quilting this little project was an exercise in one step forward, two steps back. Besides not knowing for the longest time how to quilt the tree blocks, once I did figure it out, I ended up re-quilting all 12 of them because I hated the way they looked. The nylon thread I had used just didn’t look right, so I ended up using matching thread. Tension issues led me to quilt nearly half of them yet a third time.
On top of that, I’m hoping the stain in one of the rail fence blocks hasn’t permanently set in.
I’m not exactly sure how it got there; it’s possibly an acid stain from the packing paper the quilts were wrapped and stored in while we moved and built our house. More likely, it was caused by a Texas cockroach (no amount of pest control keeps them ALL away). Disgusting, I know.
The backing is pieced with leftovers from the top:
I used a simple cable design for the border:
Here’s a look at the free motion machine quilting of a tree from the back:
and a maple leaf:
The vertical lines running through the leaf are the ditch quilting lines inside the rail fence blocks.
My machine quilting is definitely improving, but I still find it intimidating.
My second finish is this simple, 46″ x 54″ quilt:
There must’ve been a perfectly good OCD reason for the last square in the bottom row to be red instead of blue, but so much time has passed, I don’t remember what it was.
The squares are quilted with diagonal lines spaced two inches apart and the sashing strips and border are quilted with a single cable design.
It’s made with Aunt Grace Christmas prints, which were available between 1996 and 2001.
Check out these vintage cuties:
Here is the backing fabric:
The only two places I could have bought these prints is Houston or a little shop in Estes Park, Colorado. The striped fabric used for the binding was purchased at the Houston Quilt Festival in the early 2000s.
Completing the binding for all eight Santa place mats is the third and final finish. Here they are with their matching table runner:
Although the curved edges in this project required it, I discovered that I’m not fond of working with bias binding!
It feels good to say “done,” but there’s still a lot on the list, so I’d best keep on keepin’ on.
Lately, I haven’t posted all that frequently, but I have been working on quilting projects, in between house cleaning, tending to a high school senior and baking for Eric. If you’ve been following the story of Eric’s Christmas packages, they finally arrived in Afghanistan after Christmas. Meanwhile, in response to my request for an update on their delivery status, the post office emailed me a link to their customer service survey with a request to fill it out.
Huh?
Three or four days later, I finally received a form letter in my inbox explaining that mail for overseas military members goes into a ginormous black hole so no one can be accountable—well, that clears things up nicely, doesn’t it?
We packed two more boxes of snacks and other items to send, hoping that now that the Christmas rush is over, it will take less time for them to reach their destination—why did I just say that after what I wrote in the first paragraph above? I suppose my head needs examining now.
One of the boxes has four loaves of quick bread: two apple, two pumpkin, which I hope Eric will share with his maties (I know that’s not a word, but it sounds cute, so I’m going with it).
At our TSA meeting on Tuesday, I finished stitching the binding onto my Christmas tree table runner:
I increased the amount of quilting on the tree trunks, and I think they look much better with more.
I completed two more sets of rows on my scrappy 1930s quilt. I really, really like the way it looks but don’t think I’ll take on another one of this kind.
You sew and sew and sew to get your 4-patch, you sew and sew and sew to get your 6-patch, then you sew and sew and sew to put bunches of them together and four hours later you have a row. Then you get to pin match 30-plus seams and sew some more and hope this doesn’t happen:
Annlee called last Friday afternoon in a state of panic. She was in the final stages of completing two commissioned quilts for a cabin resort. To speed things along, she had sent one of the quilts out to be bound and was in full distress upon its delivery back to her. She needed help. Pronto.
Saturday afternoon, she brought the quilt over so I could join her panic fest. The binding was to finish at ½”, which can be achieved one of two ways:
Cut the border (or your perimeter blocks if there is no border) slightly bigger to accommodate a ½” seam or…
Sew it with the usual ¼” seam and trim the backing and batting ½” from the seam line.
Annlee’s subcontractor had sewn the binding on with a ¼” seam and trimmed the backing and batting even with the raw edges of the quilt top. This would leave the binding empty when it was turned and stitched to the back. To remedy this, the subcontractor zigzagged a piece of cording to the edge…and things deteriorated from there.
We discussed at length how to tackle it and before she left, we removed the cording. While I was itching to remove the binding and start anew, Annlee was reluctant. We exhausted our discussion of solutions for the quilt and set it aside, turning our attention to the other quilt.
Annlee left both quilts at my house. Looking back, I hope that physically separating her from the source of her stress for 24 hours was a good thing.
Late Sunday afternoon, I gave Annlee the second quilt with binding attached so she could begin hand stitching while I worked on the other quilt. We talked some more about how to handle the other one and at one point she said, “If you take this binding off, I’ll be really mad at you.”
Sunday night after trying to fix it without removing the binding, I caved and spent about 2½ hours picking stitches while listening to Return of the Jedi.
Monday morning, I was well into the groove of getting the binding back on to the other quilt, using a good number of rulers and chalk markers in my collection. My goal was to
avoid stitching over triangle points
maintain a relatively consistent block dimension
keep the edges straight and square in spite of no excess to work with as it had all been trimmed away—argh!
I emailed Annlee about 11:30 asking her to give me the entire day. I needed peace and quiet to measure, mark, pin, sew and concentrate. She wrote to say okay and that she’d had time to manufacture a small flange consisting of a length of muslin to which she machine basted a strip of batting.
The plan was to butt and stitch the flange to the edge of the quilt to provide something to wrap the binding around when it was time to turn it to the back.
She called a little later and said, “You took the binding off, didn’t you?”
“Yes.”
Busted.
But I just couldn’t work with it any other way but off!
I realized that in asking her to give me the entire day, I was also asking her to trust me 100 percent and yield control. Doing so at that point I suspected might have been counter to her instincts, given she had just done that with her subcontractor and was now dealing with such a negative result. I was grateful for her confidence and it made me even more determined to help make things right for her.
On Tuesday night I handed off the second quilt to Annlee with binding re-attached, this time sewn straight with properly mitered corners, diagonally joined ends, square edges and no chopped off triangle points.
Attaching the binding to this quilt was an exercise in compromises.
The biggest concern was dealing with the points of the triangles around the perimeter of the quilt when all the excess had been trimmed away. There were points that barely had ¼” of layers extending beyond them while the one right next door might have a generous ⅜” beyond it. This made me wonder if the binding had been sewn on accurately to begin with.
Add to that the need to make sure all the blocks measured 15½”, it’s no wonder Annlee was so stressed.
Now though, we were confident she could attach the flange with relative ease (relative because the quilt measures 80 inches square and it is a beast to support and guide through the machine).
We traded quilts again so I could continue hand stitching the binding to the first one while she worked on the other one.
Yesterday, despite my best effort, I handed it back to her with about 18 to 20 inches left to go.
Here’s Annlee holding one of the quilts.
When she arrived at my house to pick it up, she came to the door carrying this bouquet of gorgeous peach colored roses to say thank you:
It felt good to put the quilts back into her hands, but it felt even better knowing I was able to help.
I took a break from the last bit of quilting on the Christmas table runner to make binding for it with this print:
I prefer double or French fold binding because with two layers, it’s sturdier than single fold, which should add to the quilt’s longevity. Double fold is also faster and easier to tack to the back because there is no raw edge to fold and press under as with single fold binding.
I also prefer straight grain (cut from width-of-fabric strips) versus bias binding. If I ever make a quilt with a scalloped border or any other type of curved edge, I’ll use bias binding.
The first step to computing the number of strips needed to make straight grain binding is to determine the total length of binding you need:
[(length + width) x 2] + 10
The extra 10 inches is needed for seam allowances, mitering and to give you enough to work with when joining the two ends.
Now take the total length and divide it by 40 to get the number of width-of-fabric strips to cut. For the table runner, I needed 150 inches of binding, so:
150 ÷ 40 = 3.75
It’s difficult to cut ¾ of a strip, so round up to four.
Now scroll through the photos below for a quick tutorial on how to make binding for your quilt.
Diagonal seams give a professional finish to the edge of your quilt.
Try not to stretch or pull on the binding strip while pressing it in half.
Scroll through the photos below for a tutorial on how to connect the ends of your binding strips in a way that will appear unnoticeable. Making the last connection a diagonal one means it looks just like all the other seams in your binding—no one will ever know where you started or ended. Pretty cool!
We encountered many customers at the shop who would hyperventilate over the thought of mitering binding corners and none of us could ever figure out why. It’s not difficult at all—you just need to pay a little attention. Here, I’ll prove it:
Picking up from yesterday, you have now sewn the binding strip from the middle of one side to within ¼” of the first corner. The quilt has been removed from the machine and the first corner area is lying on a flat surface in front of you.
Fold the binding strip straight up and away from the quilt to create a 45-degree angle. Use the 45-degree line on a 4″ or 6″ ruler to ensure you have a true 45-degree angle to your binding strip.
Do this by aligning the top and right sides of the ruler with the edges of your quilt. You may have to adjust the binding strip a bit until the 45-degree fold aligns with the ruler line, but when it does, insert some pins from the top to maintain the angle while you finish the miter.
Fold the binding strip back down toward the quilt, aligning it with the top and right sides of the quilt, using pins to hold the original miter. Continue pinning the strip in place at least part way down the next side.
Mark a small dot ¼” from the top and right sides.
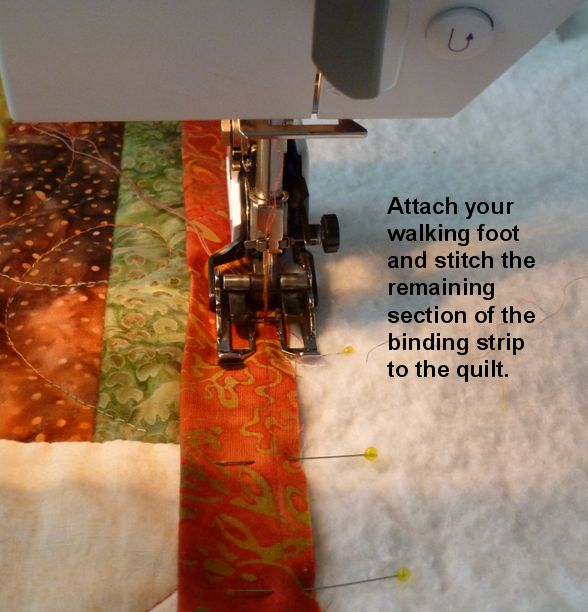
Position the quilt under the walking foot and lower the needle into the dot. If you’ve measured accurately, you will feel the needle pierce the bump made from your previous ¼” stop.
Sew along the second side. Here are a couple photos of the front and back side of the miter: